Thursday, August 28, 2014

Shaved Brussels Sprout Salad

Shaved Brussels Sprout Salad!

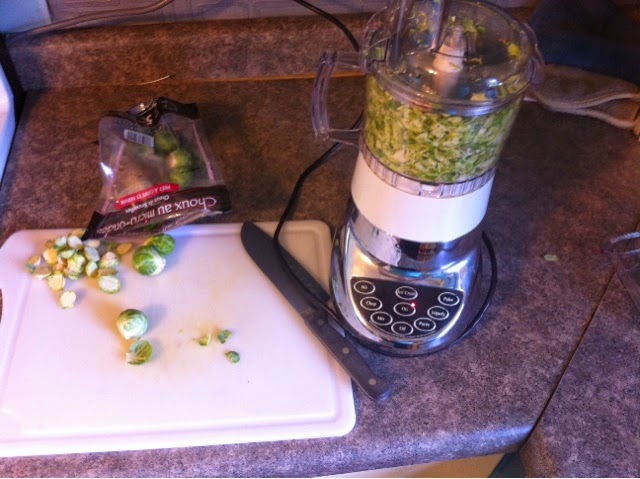
Okay, Folks, it's confession time again!  This is a salad that was born out of the need to try out my new toy!  I have always wanted a food processor, and I finally bought the attachment for my beautiful blender! 

 I have seen many different versions of brussels sprout salads, and decided to come up with my own light and fresh shaved version to go with our...  ehem...  steak dinner!  The key to eating lighter, is to have a small indulgence, like sharing a gorgeously grilled steak with my boys, and having a healthy light salad on the side, right?

Start out with shaving the brussels sprouts, I used a pound.  If you don't have a handy dandy food processor, you can chop away with a knife, or use a mandolin, just watch those fingers!  Also shave one red bell pepper, and toss everything into a large bowl.


Oh man, that's so pretty!  I may be a little overly excited...


Now, the dressing!  

3 chopped green onions
zest of one clementine
juice of 2 clementines
2 Tablespoons drained capers
1 teaspoon of oregano, rubbed between your hands
1 Tablespoon dijon mustard
1 Tablespoons red wine vinegar
3 Tablespoons good Extra virgin olive oil
At least 2 teaspoons salt, and fresh black pepper

Whisk away to emulsify.


Drizzle dressing over the whole salad, and mix well.  Taste for salt, and pepper.


This salad is also great for parties, because it is better a few hours after making it!  Hope you enjoy!!

Tuesday, August 26, 2014

Sirloin Vietnamese Pho

Sirloin Vietnamese Pho!

It seems that every culture in the world has it's comfort soup.  Americans love tomato or chicken noodle, Mexico has tortilla or posole, Koreans love kimchee soup, Japan has miso soup....  the list goes on!  Last night, my son asked for ramen noodles for dinner, and I decided to take it up a notch with a touch of our favorite soup to eat in Hawaii...  Vietnamese Pho (pronounced fuh)!  It is a comforting, and nutritious bowl of the most delicious broth, rice noodles, fresh herbs, and fresh veggies, topped with lime and Sriracha, and it is so delicious!

Start with a big pot of stock.  I made enough for several meals, so I used a box of sodium free veggie and sodium free beef broth, and about 4 cups of water.  I added:

1 Tablespoon fish sauce
1/4 cup low sodium soy sauce
several slices of fresh ginger
3 smashed garlic cloves
3 jalapenos whole, with slits
1 bunch of cilantro stems
zest of one lime


Boil stock for about one hour, strain, and taste for salt.  I like to start with all low sodium liquid, then add kosher salt at the end, it helps keep a lower sodium content.  You should be able to taste a bit of the tangy lime, soy sauce, grassy cilantro, garlic, and ginger.  The broth isn't meant to be salty, but the salt really helps bring out the flavors.


One of my favorite things about this soup, is that you truly make it your own!  Fill your bowl with cooked rice noodles, and very thin slices of lean sirloin beef.  Some suggestions for the fresh toppings:

thin carrot slices
thin radish or dikon slices
edamame
bean sprouts
fresh basil
fresh cilantro
sriracha (not optional, in my opinion!)

I love to load up on veggies, equal parts with the noodles, it makes it equally comforting, but still healthier!  Be careful with the sriracha, the hot broth intensifies the spiciness!  The most magical part, is slowly pouring the hot magical broth over the raw meat and veggies, and watching as the meat just begins to cook!  I hope you can make it your own, enjoy!


Roasted shrimp and edamame

Roasted Shrimp and Edamame!

This is a ridiculously simple dinner.  A dinner for any working parents who need an answer to those nights, when they have gotten off work late, the kids are starving, and fast food or microwave meals seem like the absolute resort.  I have a super quick answer!  Skip the fatty, over processed meal, and opt for this delicious and fun dinner!  

Okay, so don't laugh...  open a large package, or two, of shelled edamame...  and pour it on a pan!  No need to even spritz with oil!  Now, here's the tricky part...  open a bag of large shrimp in shell...  and pour it on the pan!  Try to nestle the shrimp into pockets of the edamame, then sprinkle with salt and pepper.


Pop in the oven at 450*, and roast for about 10-12 minutes, until the shrimp have just turned fully pink and slightly curled.  Splash with the juice of one lemon, and serve!  You now have a wonderfully healthy and nutritious meal in under 15 minutes, and well under $15, which is much less than that nasty fast food dinner!

Friday, August 22, 2014

Lemon caper sautéed spinach

Lemon Caper Sauteed Spinach!

Now, this is a quick, extra healthy side dish!  I thought of it, based on a dish at my former job at Macaroni Grill, called Shrimp Portofino.  It is shrimp and spinach, with a heavy lemon butter sauce, and it is delicious!  The only problem is the healthy spinach being overturned by the sauce!

Start this healthier version, in a large saute pan, with 2 teaspoons of extra virgin olive oil, 1-2 Tablespoons of drained capers, 2 minced garlic cloves, and the juice of one lemon over medium heat.


When the garlic becomes fragrant, start piling in the spinach!  I used 2 8 oz bags.  I know it seems like a ton of spinach, but it actually cooks down to about 2 cups, and my husband and I were having it as our only side!  Cover and let the spinach steam over low heat for about 3-5 minutes, then start turning slowly.


Judge the liquid in the pan as you go, make sure the pan isn't too dry!  You can add your favorite stock, more lemon, or simply a splash of water to keep the steam going.


When the last bit of spinach has just wilted, pull the spinach out. It will continue to cook a bit as it cools, so pull it out earlier than it's ready.  Drain the juices in the pan, and allow the liquid to reduce by about 1/2, so it is more concentrated, then drizzle over the greens.


I served this side with my lightened turkey meatloaf, the comforting main dish was lightened by the lemony spinach, it was delicious!  Enjoy!

Turkey meatloaf

Turkey Meatloaf!

Meatloaf is one of the great family comfort foods.  And it's so simple to make!  A little ground meat, bread crumbs, seasoning, maybe an egg?  It is a deliciously heavy savory treat!  Of course, fitting the theme of my blog, I had to lighten it up just a bit!

Start with a 20 oz. package of lean ground turkey.  I like to mix it all up in the package tray, in interest of saving some dishes!  Sprinkle with 1 teaspoon of paprika, 1/4 c. of whole wheat bread crumbs, and 1/2 of my sauce mix:

2 Tablespoons ketchup
2 Tablespoons barbecue sauce
2 Tablespoons mustard (I like spicy brown or whole grain, and Dijon)
1 teaspoon Worcestershire sauce


Lightly mix all the meat, just until the breadcrumbs are incorporated.  It is very important to NOT over mix!  Trust me, my husband still makes fun of my "cat food" meatloaf incident!  Form into a loaf shape, in a 9x13 pan with deep sides.  Make sure there is plenty of space between the loaf and the pan sides, so there is somewhere for any excess fat to go.  Spread the other half of the sauce mix on top.


Bake meatloaf at 400*, for about 45 minutes, or until the center reaches 165*.  I strongly recommend using a meat thermometer!  


After removing from the oven, allow meatloaf to rest for at least 20 minutes, then cut in 1 inch slices, and serve!  Enjoy!


Wednesday, August 20, 2014

Grilled salmon, with grilled corn, tomato, and avacado salad!

Grilled Salmon, With Grilled Corn, Tomato, Avocado Salad!

One of my favorite ways to eat during the summer, is to have a beautiful simple meat, with a light fresh salad of whatever is in season.  Right now, in late summer in Wisconsin, that means corn, corn, corn!  Well, and tomatoes, too!  This was a dish that i just kind of randomly created, after finding these gorgeous cherry tomatoes and some beautiful sweet corn at the farmer's market, and salmon was fresh and on sale at the store!

First step was the tomatoes.  Not many people know that salted tomatoes give off some of their water, and that it is delicious!  Slice about a pint of your favorite cherry tomatoes, a stalk of green onion, and a hefty pinch of salt.   Mix well, and set aside.


Now for that salmon!  When choosing salmon, there are several things to consider.  One is to look for wild caught.  You can go for sockeye salmon, with it's ruby red color, but it's about 50% more...  and I love the flavor and texture of the wild Pacific salmon.  Make sure the color is bright, not milky, and make sure the inside of the plastic wrap looks clean, not slimy!  One more thing is to lightly press the salmon, making sure it is springy, not mushy.  It should bounce right back.  Lastly, if you open the package, and it smells really fishy, take it back!  It should smell lightly oceanic, not spoiled.

I like to treat this beautiful fish simply.  I sprinkle pretty liberally with salt and pepper, and oil the pan it's grilled in, and that's it!  My 4 year old is a salmonholic, he likes teriyaki sauce, and a gigantic portion...  last night he threw down at least two adult portions. 


When your tomatoes have given off some of their juices, add about 1/2 cup of plain, fat free Greek yogurt, 1 diced avocado, and the juice of 1/2 of a lime.  I know the yogurt sounds kind of funky, but imagine it as a replacement  for sour cream, with none of the fat, and added probiotics!  


 Now, toss the salmon on the grill, lid closed, for about 10-12 minutes without flipping, and they should be just cooked through, and lightly smokey.  Grilling is my handsome Hubby's job, so I get the luxury of just handing it off.


I love to serve this on a big bed of spinach!  If the salmon goes on the spinach while it's hot, the spinach will slightly wilt, and take on some of the smokey salmon juices, and the corn salad has enough dressing for the greens.  Plus, as an added bonus, you won't go back for seconds, as your belly is full of green goodness!


Another bonus of having a grill master, is the corn!  I love naked grilled corn, the smokey and charred parts enhance the sugary sweet corn!  


Wait for the corn to cool a bit, then cut the kernels off, and add them to the tomatoes.  Mix them up, and taste for seasoning.  I like to add a bit more lime in place of salt, if it's needed.


Now, serve the corn tomato salad under the salmon, sprinkle with chives for a little extra decoration, and enjoy!  


Tuesday, August 19, 2014

Fajita salads!

Chicken Fajita Salads!

Fajitas are delicious.  Meat, onions, and a mix of peppers, grilled or griddled, with lots of oil and butter, served with sour cream and a mountain of tortillas!  Not to mention the restaurant chips and salsa.  Oh, and if you're really dangerous, you get the queso!  Mmmmm, melty cheese.  Now you will have a delicious recipe for chicken fajitas at home, for a tiny fraction of the calories!  Not to mention, you can easily skip the chips, tortillas, and queso!  

This recipe is so easy, and just as delicious as a restaurant quality plate of fajitas!  Start out with the chopping.  I know, I know, lots of chopping.  On your regular veggie cutting board, slice onions and a mix of 3 different colored bell peppers.  If you're really adventurous, a jalapeno or two!  

On a different, raw meat dedicated cutting board, slice the 2 pounds of chicken in 1/4 inch slices.  I like to use one hand to get messy holding the raw chicken, and one hand to stay clean on the knife, and also to sprinkle the seasoning.  It is much easier!  Sprinkle the chicken with salt, pepper, garlic powder, chili powder, and cumin, and mix with the dirty hand.  Now wash your hands!


Give your cast iron pan time to heat up to medium high.  If you don't have a cast iron, no worries.  Just make sure you get it to a higher heat.  I like the cast iron for this, because the heat doesn't drop, and you get better browning.  Drop the chicken in the pan, with a spray of olive oil, and let sit for at least 5 minutes to develop a good sear, then begin to turn.


When the chicken is 3/4 of the way cooked, toss in the onions, and let them soften for about 3 minutes.  You can turn the heat to medium now.


Now for the peppers!  Toss them in, and let them cook down for about 3-5 minutes.  I like to still have a crunch, so I go for 3.  If too much liquid builds up in the bottom, push the chicken and veggies to the side for a bit, and turn the heat back up, just until it reduces. 


Just before the peppers are done, toss in half a pint of cherry tomatoes.  I just like to warm them.  I know it's not traditional to have tomatoes in fajitas, but I think it adds a nice touch!  And I love baby tomatoes when they are warmed through!  If you are using cast iron, remove from the heat now, it will cook for a few more minutes.


This is where these fajitas are great for parties.  You can choose whether to eat as a rice bowl, traditional fajitas, or a salad!  Makes a great buffet!

I like to do a salad, with sturdy greens like spinach or baby kale.  Choose a green that you don't mind wilting a bit from the warmth of the chicken and veggies.  I like my salad with a few chopped fresh tomatoes, slices of avocado, and topped with cheese and the kicker...  plain fat free Greek yogurt in place of sour cream!  Enjoy!

Friday, August 15, 2014

Turkey and veggie hash

Turkey Veggie Hash!

Okay, so you caught me, I have never had traditional hash.  You know, the greasy diner classic, with corned beef, onions, potatoes, and maybe a little splash of peppers...  It's comfort food at it's finest!  I love the idea of sprucing up the idea of hash.  It is a perfect one pot meal, meat, starch, and any veggies you want!  

For this night's simple dinner, I decided to use ground turkey, some funky purple and red new potatoes and kale from the farmer's market, mushrooms, corn, and a beautiful yellow bell pepper! 

I started this one pot wonder, by seasoning the turkey.  I figured seasoning the extra lean turkey more like a sausage, would add a ton of flavor, without any extra calories.  I used fennel seeds, paprika, crushed red pepper flakes, salt, and pepper.  Mix the meat, and allow to rest, while you chop the veggies, onion, and garlic!


Get your turkey in a pan over medium high heat, with a spritz of olive oil.  Don't touch it for a few minutes, really let a brown char develop on the meat.  This helps give a ton of deep flavor that makes the turkey seem meatier.  Brown at least both sides of the meat, before chopping up into chunks.  Push the turkey aside, and brown the mushrooms and onions in the center of the pan.  Don't add salt, until the veggies go in!


This is where you can add your garlic, potatoes, bell pepper, and any other heartier veggies you want to add.  Stir every few minutes, but not too often.  Really allow that browning to develop!  This is also when you add your salt, pepper, and any other seasonings that sound good.


Once the potatoes are fork tender, add your favorite greens, and I love some sweet corn in this.  I love a heartier green with this, like Swiss chard, or any kale.  I feel spinach just gets too soft under high heat.  This is where I like to add a splash of liquid, like a splash of Worcestershire sauce, and either stock, or beer.  Keep stirring the pan, and turn the heat to low.  Cook just until all the greens have turned dark green, and have just wilted.


This is such a hearty and satisfying meal, while being very nutritious, and good for the waistline!


Monday, August 11, 2014

Island roasted broccoli

Island Roasted Broccoli!

This is a recipe I came up with when we were stationed at Schofield Barracks, and learning all about Hawaiian and Pacific Islander food!  My husband was on a 24 hour CQ shift (24 hours, running the office in the barracks), and our tradition was for me to cook some homemade food for him and his buddies on shift.  That particular night, I also brought a roasted turkey breast with an island rub, and I thought...  'Why not put it on the broccoli?'  I tried it, and it was a huge success!  

Start out with the wet rub.  I used:

1/4 cup dark brown sugar
1 Tablespoon soy sauce
1 teaspoon toasted sesame oil
2 teaspoons sesame seeds
2 teaspoons hot chili powder
1/2 teaspoon garlic powder
1/2 teaspoon ginger powder
1/4 teaspoon cloves

Mix the seasoning together, and set aside while cutting the veggies.


Chop 1/2 red bell pepper, and about 6 cups of broccoli into small florets.  


Toss the broccoli and bell pepper in the sauce, and keep tossing, until there is a light even coating on all the veggies.  Arrange in an even layer on a well greased and lined sheet pan.  Believe me, you really don't want to be scrubbing the caramelized brown sugar off your pans!


Roast at 400*, for at least 20 minutes, until  browned, caramelized, and the veggies are softened.  You are going to love this side dish, it's sticky, sweet, salty, a bit spicy, and so savory from the sesame!  Enjoy!

Sunday, August 10, 2014

Baked zucchini and tomatoes

Baked Zucchini and Tomatoes

I have no idea where this idea came from.  We had a heavy lunch yesterday, had an abundance of veggies from the farmer's market that morning, a long day of errands, and just wanted something comforting and healthy.  I really have no idea how this came together, but it was amazingly delicious.  My husband wants it again tonight!

This is literally a 4 ingredient dish, and is so incredibly juicy, filling, and comforting.  Start out with any tomatoes, I had huge amounts of cherry tomatoes from the market, and literally the biggest zucchini I've ever seen!  Really, I used about a pint of cherry tomatoes, and about 2 medium zucchinis.  Cut the tomatoes in half and line the bottom of a greased baking dish.  Cut the zucchini in rounds.


Do a rustic layering of cherry tomatoes, and zucchini, until you hit the top of the dish.  This gets really kind of soupy, so make sure it's not packed too tightly, and has lots of room for juices!


Once you get to the top, sprinkle with salt and pepper, and add about 1/2 cup of your favorite marinara sauce.  I actually used homemade leftover marinara from making pizza a few days ago!  Just use whatever you know is good, this is an easy breezy dish!  


Cover and bake at 350*, until the sauce and veggies just begin to bubble.  Pull from the oven, and top with rounds of fresh mozzarella and a sprinkle of Parmesan, and pop it back in.  Okay, with the Parmesan, it's 5 ingredients, but who's counting, anyway?


This dish is done, when the sides are bubbling away, and the cheese has begun to brown.  This is not a pretty dish, but it is sooooooo good!  Serve in bowls, it is very very juicy, and make sure you have napkins on hand!  Enjoy!


Saturday, August 9, 2014

Roasted tomato soup


Roasted Tomato Soup

This recipe was written on a chilly, rainy spring day up here in what I call Wiscanada.  (North Wisconsin, almost Canada)  I was at the grocery store, after running through the cold drizzly weather, and was honestly, pretty miserable.  I had no inspiration for dinner...  until i got in the produce section, and those gorgeous Roma tomatoes caught my eye!  I immediately shot back to childhood, when my parents would make tomato soup and grilled cheese for dinner on icky days.  I am sure most American children have the same story!

Full disclosure, I had never made tomato soup before, but it really came together as I imagined it up!  I started with 15-20 red ripe Roma tomatoes, halved, and laid on a lined sheet pan, cut side up.  Next, top each tomato with sprayed olive oil (I like to put good olive oil in a Misto can), 4 finely diced cloves of garlic, rubbed into the tomato juice so they don't burn, dried Italian herbs, and salt and pepper.


Roast the tomatoes at 350* for 45 minutes, until the tomatoes are slumped, and the garlic is fragrant.


In a large sauce pot, simmer all the tomatoes, with all their juices, 2 cups of your favorite stock, 2 bay leaves, and salt and pepper. Simmer for about 30 minutes, until the tomatoes begin to break down.


There are two ways to blend this, with a stick immersion blender, or in a counter top blender.  If you use a counter top blender, Make sure to allow the tomatoes to cool, and only fill the pitcher half full, and keep your hand and a towel firmly on the top to prevent an explosion!  I prefer the stick blender, it is easier, and has less to clean up.  Let the soup cool a bit before blending, so there's no scalding splatter!


Once smooth, bring soup back to temperature, and add a cup of milk, coconut milk, or milk substitute of your choice.  I really love the coconut milk, it gives a touch of sweetness with the creaminess that balance out the acidic tomatoes!  Taste for salt and pepper, and consistency, you might need a touch more stock to thin it out.  

Now, most importantly, grill up some paninis or grilled cheeses for dipping, and settle in with a movie and a warm blanket until the weather clears!